

Time: about 20 minutes · Role: Member or Admin to build and run it, and a second Member or Admin to approve · Works on: Enterprise and SaaS. A SaaS Free plan allows 3 agents and workflows together. On a SaaS personal account you approve your own run (see stage 2) · You need: a colleague who will approve, ideally in a group such as “Managers” (an Admin creates groups in Settings › Users & groups)
Watch: Automate a process with approvals (1 min 46 s)
Workflows carries a Beta badge. Screens, options and defaults may still change.
What you will have at the end
- A published expense approval workflow with an input form, a drafting step and an Approval step.
- One run of it, started from New task and approved by a colleague.
- That run in Tasks, with its output and the approval decision on record.
1. Describe the workflow and let the builder build it
1
Open the builder
In the sidebar, under Workforce, click Workflows, then Build a workflow. The page What do you want to build? opens with Workflow selected.
2
Describe the process
Say what the process starts from, what happens along the way and what it hands back. For this guide:“Take an expense claim: the employee’s name, the amount in euros and what it was for. Draft a short summary of the claim for the manager. Then ask someone in the Managers group to approve it. When it is approved, hand back the summary.”
3
Build
Click Build. It usually takes about a minute.
4
Look at what it built
The steps appear on the right, beside the Builder pane, and the builder gives the workflow a name, for example “Expense Claim Approval”. Inputs your workflow will ask for lists the form’s fields. If there is no Approval step, type “Add an approval step after the summary” in Describe changes to your workflow… and send it.
The steps on the right include one that drafts the summary and an Approval step after it.
2. Save it and check the approval step
1
Save as a draft
Open the menu beside Save & publish and choose Save as draft. Then click Open it to go to the workflow page.
2
Open the approval step
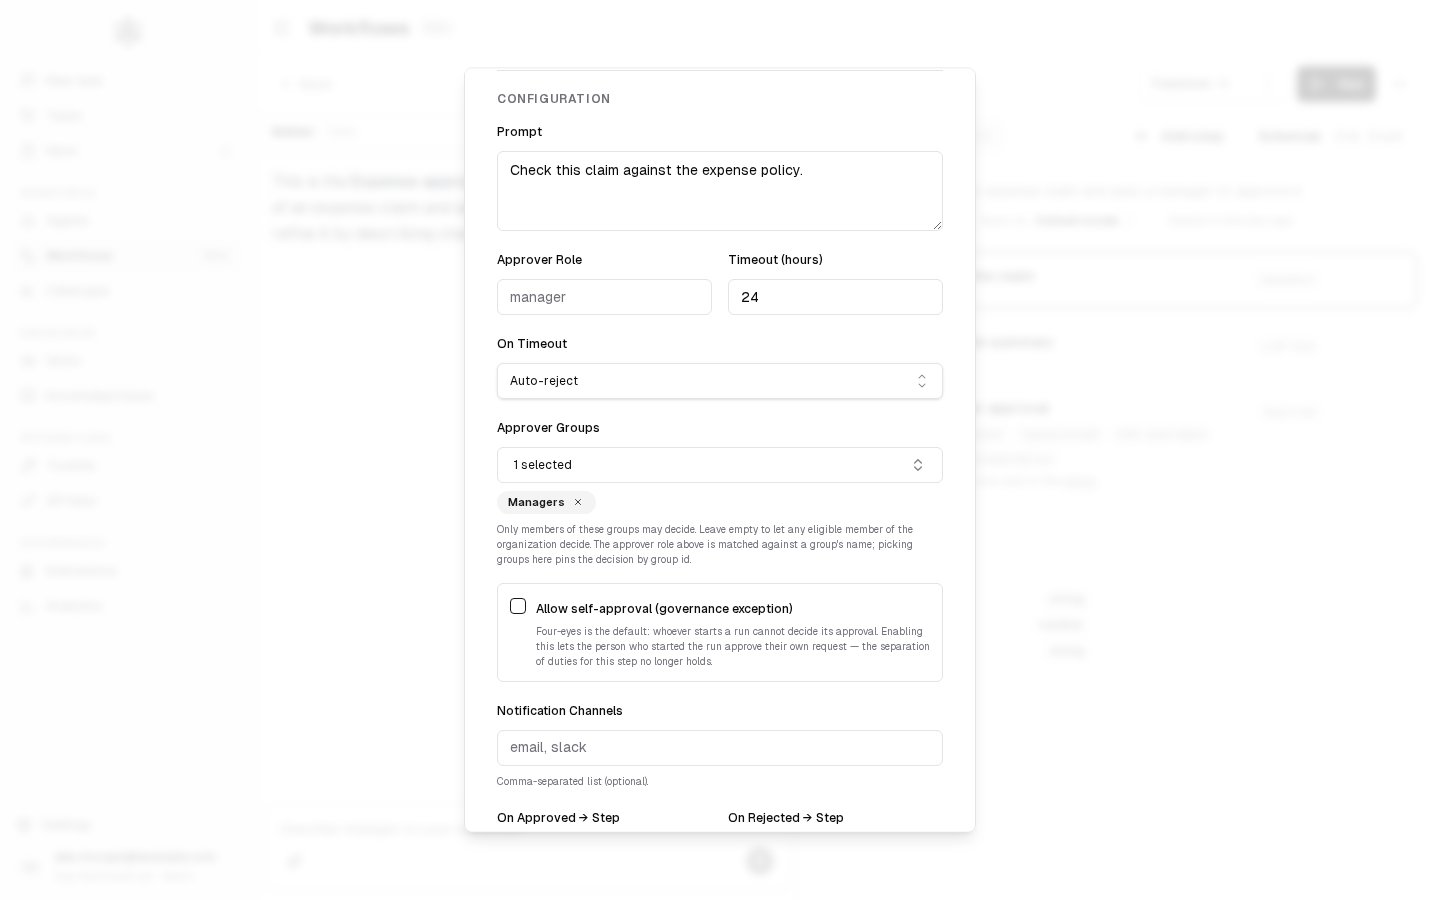
On the Steps tab, point at the card marked Approval and click the pencil that appears on it (Edit step). Edit Step opens.
3
Say who approves
- Prompt: what the approver is asked, for example “Check this claim against the expense policy.”
- Approver Groups: pick “Managers”. Its members and the Admins can then decide. If Approver Role holds text, people whose role or group name matches it can decide too. Clear it to keep the group alone. With neither set, anyone who can see the workflow can decide.
- Timeout (hours) and On Timeout: by default 24 and Auto-reject. Leave them.
- Allow self-approval (governance exception): leave it off. Turn it on only on a SaaS personal account, where nobody else can decide.
4
Save
Click Save Changes in the dialog, then Save in the header.
The Save button is gone from the header, and the header shows a Draft badge with the new revision number.
3. Share it and publish it
Approvers see a request only for workflows they can see, so share the workflow before anyone runs it.1
Open the sharing settings
Click More actions (the ⋯ button in the header) and choose Settings & sharing. On a SaaS personal account it is called Settings and has no sharing.
2
Choose who can see it
- Member: choose Public, so everyone in the organization can see and run it. A private workflow of a Member is open only to them and the Admins.
- Admin: you can also keep it Private and add the people or groups who should use it, the “Managers” group included.
3
Publish
Click Publish in the header. In the dialog (titled Publish revision r2, for example), you can write a Review note (optional), which is recorded on the audit trail. Click Publish.
The header shows Published with the revision number, for example Published r2.
4. Run it from New task
1
Pick the workflow
Click New task. Open the worker selector at the bottom of the message box and pick your workflow (“Expense Claim Approval”, for example) under Workflows. It shows its published version, for example v2 · published.
2
Fill in the form
The message box turns into the workflow’s form. Enter a name, an amount such as 86 and a purpose such as “Train ticket to the Berlin client meeting”. A badge below the form reads Ready once every required field is filled.
3
Run
Click the run button (the play icon), or press Ctrl+Enter (⌘+Enter on a Mac). The run’s task page opens and its steps appear as they run.
The run’s Status reads Waiting for approval, on its task page and in Tasks.
5. Approve it in the Inbox
The approver does this stage. Whoever started a run cannot decide its approval, Admins included, unless the step allows self-approval.1
Open the Inbox
The approver clicks Inbox in the sidebar. The number beside it counts what waits for them. The request is on the Waiting for you tab.
2
Review the request
Click the row. A panel opens with Your approval is needed, the step’s prompt and the details of the run, such as the fields of the claim.
3
Decide
Write a Comment, which is recorded with the decision. Add Evidence, such as a link to the receipt, if it helps; it goes on the audit trail. Click Approve & resume run. A message confirms Approved — the run has resumed.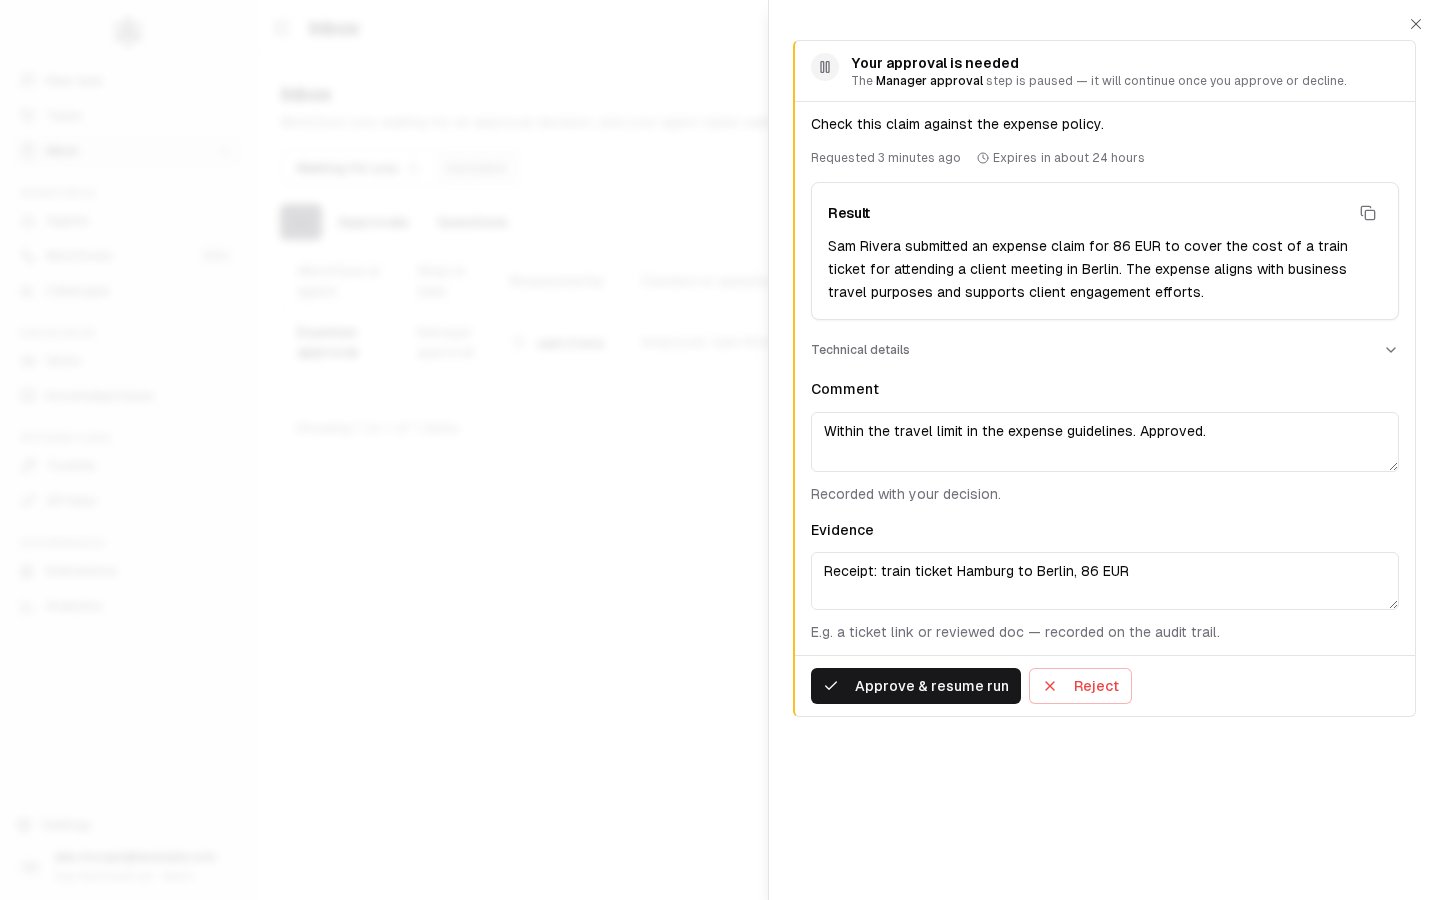
The request leaves Waiting for you and appears under Decided as Approved, with the approver’s name and comment.
6. See the result in Tasks
1
Find the run
Click Tasks in the sidebar, choose Workflows above the list and click the run.
2
Read it
The Status is Completed. Output shows the summary the workflow handed back, as Formatted fields or as JSON. Approvals shows who decided, when, and their comment.
The run is Completed and its Approvals section names your colleague. Record opens the run’s sealed record in Interactions.
If something goes wrong
- The approver has nothing in their Inbox. They see an approval only when they can see the workflow and match the step’s approver group or role. Share the workflow (stage 3) and check that they are in the group. Viewers have no Inbox.
- The decision buttons are off, with a line saying you started this run and someone else must decide it. This is the four-eyes rule. Ask a colleague to decide, or cancel the run from the panel. When the buttons are off because the step needs a role you lack, hovering them names that role.
- The workflow is not in the worker selector. Only published workflows that are not archived are offered. Publish it (stage 3).
- Build a workflow is disabled with “Worker limit reached (agents and workflows)”. Your SaaS Free plan already has 3 agents and workflows. See Plans and limits.
Where to go next
- Building a workflow: every step type and approval setting.
- Running a workflow: run from the workflow page, cancel a run, schedule it.
- Inbox: approvals and agent questions in one list.