

Who: Admins and Members · Where: Workflows › Build a workflow · Works on: Enterprise and SaaS (on SaaS Free, agents and workflows together are limited to 3)
Build your first workflow
1
Open the builder
Go to Workflows and click Build a workflow. The page What do you want to build? opens with Workflow selected.
2
Describe the process
Write what the process starts from, the checks or approvals along the way, and what it should hand back. For example: “Score a card transaction for fraud, hold it above 60, ask a Fraud Analyst to approve the hold, then draft the customer SMS.” The description needs at least 10 characters.If the process follows the rules of an agent you can open, name the agent as it is called, for example “built on the Adverse Media Screening 1.2 agent”. The builder reads that agent’s instructions and guardrails and applies its rules to the steps, and the build report says Read the agent. You can also ask for an agent to do a step, such as “read the pages with an agent using the browser”: the builder adds an Agent Task step with the tools it needs.
3
Build
Click Build. Building usually takes about a minute, and the page shows its progress.
4
Review and refine
The Builder pane on the left holds the conversation, and the workflow appears on the right. The builder lists Inputs your workflow will ask for and suggests changes you can click. Type more changes in the box (Describe changes to your workflow…), or edit the steps directly (see Edit steps).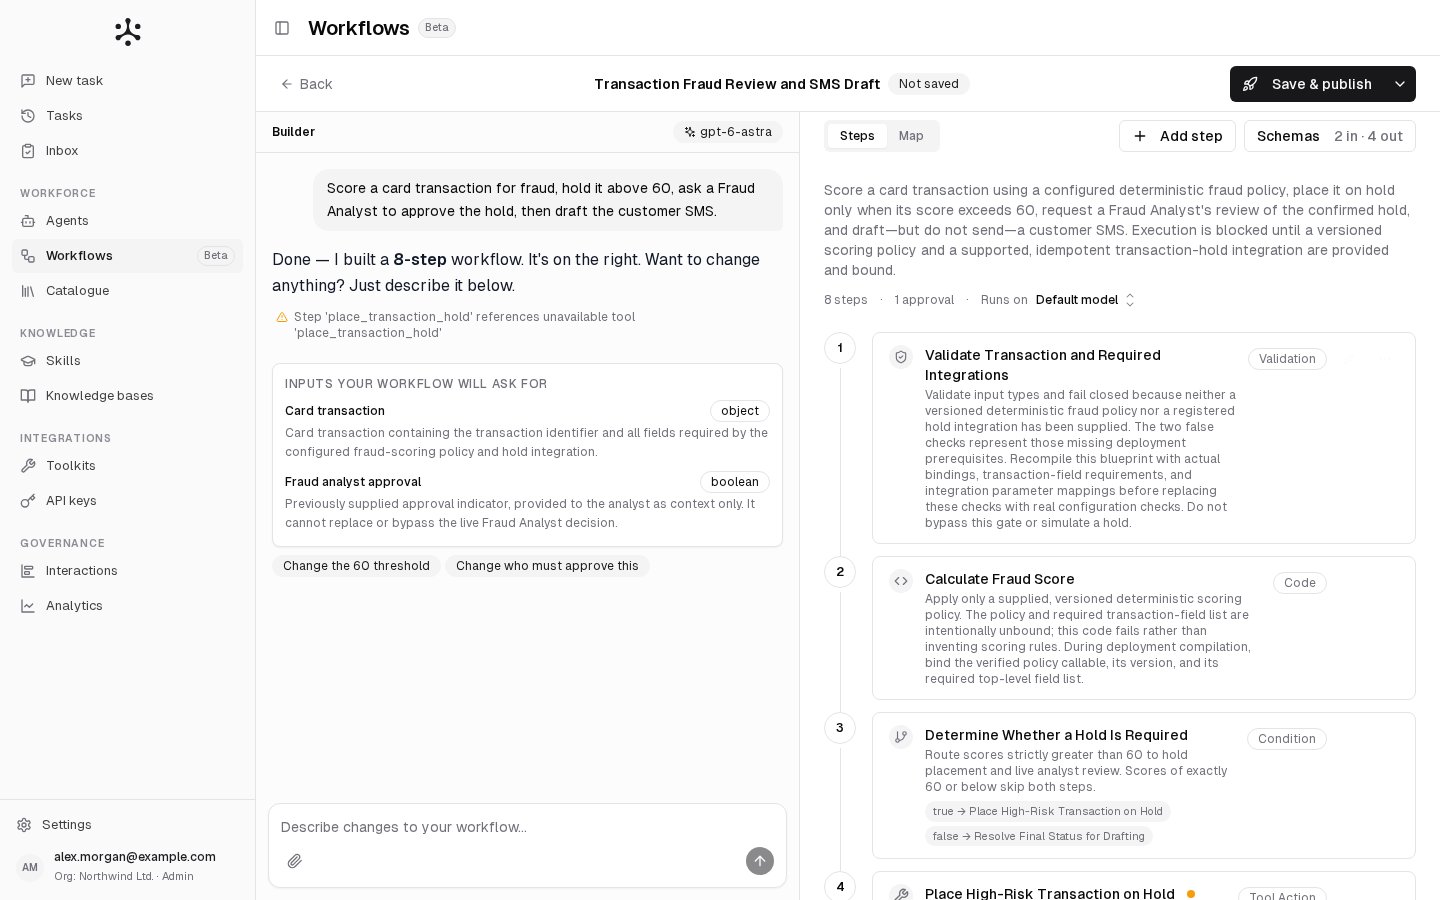
5
Save
Click Save & publish, or open its menu and choose Save as draft. Saving is disabled while the workflow has issues to fix. After saving, Run it (published) or Open it (draft) takes you to the workflow page.
The workflow page
Open a workflow from the list to edit and run it. If you are its owner or an admin, the page has three parts.- The header: the name, the state (Draft r5 or Published r3), the revision picker, Save (when you have unsaved changes), Publish, Run and More actions.
- The Builder pane on the left, where you ask for changes in plain language. You can collapse it.
- The canvas, with three tabs: Steps (the steps as cards), Map (the same steps as a diagram, coloured by the selected run once there is one) and Runs (see Running a workflow).
Ask the builder for a change
Describe the change in the Builder pane. The builder drafts it as a proposal: the canvas highlights what would be added, changed or removed, and the header shows · proposal pending. Click Accept to apply and save it, or Discard to keep what you had. While a proposal is pending, you cannot edit steps or run the workflow. More actions › Undo last change brings back the workflow as it was before the last accepted proposal. It comes back as a proposal, which you accept or discard.Fix issues
When the workflow has problems that would stop it from running, a banner says how many things need a quick fix and lists them. Click Fix it for me to let the builder fix them, or Technical details to see the exact messages. A workflow with issues cannot be saved or run.Edit steps
On the Steps tab:- Add step opens Add a step. Pick the Step type, give it a Name, and choose which steps it Runs after (optional). Configure the details afterwards on the step card.
- The pencil on a step card opens Edit Step. The step’s menu offers Insert after, Duplicate, Move up, Move down and Delete step.
- Schemas opens Inputs and outputs (see Inputs and outputs).
{{ }} templates, for example {{ input.case_id }}.
Test and publish
Every save that changes the steps, the inputs or the outputs creates a new numbered revision (r1, r2, …). Changing the name, description or sharing does not. One revision at a time is published. That is the one that runs from New task, from schedules by default, and for everyone the workflow is shared with.1
Test the draft
Choose More actions › Test run (draft). It runs your latest saved revision without publishing it.
2
Publish
Save your changes first, then click Publish in the header. The Publish revision dialog takes an optional Review note (“What was reviewed, and by whom?”), which is recorded on the audit trail.
Step types
Approval and Condition steps cannot be placed inside a Parallel or Loop step. Parallel and Loop cannot be nested.
LLM Task
LLM Task
Write the Prompt Template. You can choose its Model (Default (workflow model) uses the model in Runs on) and its Temperature, or Reasoning Effort for a reasoning model. Time limit is how long the model has to answer, 180 seconds by default.
Tool Action
Tool Action
Pick the Tool, give its arguments under Tool Config (JSON), and map result fields with Output Mapping. For a knowledge-search tool you pick Knowledge Bases instead. Mark it Idempotent when calling it twice has the same effect as calling it once. Time limit, under Advanced, is how long the call may take, at most 3600 seconds. Left empty, the tool’s own limit applies, or 180 seconds when it has none.
Code
Code
The code runs in the sandbox, a separate space set aside for running code. Code the sandbox does not allow fails with a message that starts with “Security error”, for example “Security error: Import of blacklisted module ’…’ is not allowed”. Time limit is how long the code may run, 180 seconds by default.
Agent Task
Agent Task
Write the Task and choose the Model (Default (workflow model) or a named model). Then choose the Tools the agent may use (none means reasoning only), Max Iterations (1 to 25), Time limit (600 seconds by default, at most 1800) and, optionally, the Output Fields it must return.
Sub-workflow
Sub-workflow
Pick the Workflow, its Revision (by default the one published when the run starts), the Input Mapping and a Time limit (600 seconds by default, at most 7200). The other workflow must be published, not archived, and contain no approval steps.
Condition
Condition
Write the Condition Expression, then choose under Branch Targets the step each outcome goes to.
Loop
Loop
Choose the list to go through (Collection). The loop stops at Max Iterations, 100 by default.
Settings every step has
Edit Step also has these sections, whatever the step type.Inputs and outputs
Schemas opens the Inputs and outputs panel: what a run asks for, and what it hands back. For each field you set a name, a type, whether it is required, and a description in the words of the person filling it in. Inputs can also have a default value.
Click Save schemas, then Save in the header. The run form on New task and on the workflow page is built from these inputs (see Running a workflow).
Approval steps
An Approval step pauses the run until someone approves or rejects it.
Admins match any approver role or group, but the four-eyes rule still applies to them. Viewers cannot decide approvals. For how a request reaches approvers and how they decide, see Decide an approval.
More actions
More actions on the workflow page also holds:- Overview: a plain-language summary of what the workflow asks for, what it does and the checks around it, with a Print button.
- Schedule automatic runs: see Schedule a workflow.
- Run analytics: total runs, success rate, typical and slow durations, runs by status and by how they were started, tokens and cost, and the recent runs.
- Settings & sharing (Settings on a personal account): Name, Description, Run retention (days), Data classification (Unclassified, Internal, Confidential, Restricted) and Visibility.
Limits and problems
Workflow limits (Enterprise and SaaS)
Workflow limits (Enterprise and SaaS)
- Enterprise: no limit on the number of workflows.
- SaaS: on the Free plan, agents and workflows together are limited to 3. Creating or duplicating a workflow past the limit is refused with the reason, and Build a workflow is disabled. See Plans and limits.
The build takes a long time
The build takes a long time
Most builds finish in about a minute. A large workflow can take longer: the page waits up to 30 minutes for the build before it gives up.
The request did not reach Neural Factory
The request did not reach Neural Factory
If building, saving or changing a workflow shows “The request did not reach Neural Factory: a gateway or firewall in front of it answered instead. Please contact your administrator.”, a gateway or firewall in your network answered in place of the app. Your IT administrator needs to look at it.